We notice everything inside. The floorboard that squeaks by the bathroom door. The tap that drips if you don’t turn it just so. The draft that shows up in the hallway every October.
The outside of the house? We look at it maybe twice a year. Once when we’re washing windows, once when somebody’s up on a ladder stringing lights and yells down that a piece looks funny.
Which is a shame, because your walls are pretty chatty. They warn you. They just do it in a language most of us have decided means nothing — a hairline crack here, a panel that seems slightly out of line there, a patch that’s faded a bit more than the rest. Cosmetic, we think. We’ll get to it.
The trouble is that almost none of it is cosmetic. Those little things are the early chapter of a story that gets expensive in the later ones.
The Signs Worth Knowing
None of these require a ladder or a trained eye. You can spot every one of them on a slow walk around your own house.
Cracks and chips. Any breach in the surface, even a thin one. It looks like nothing. It’s a doorway.
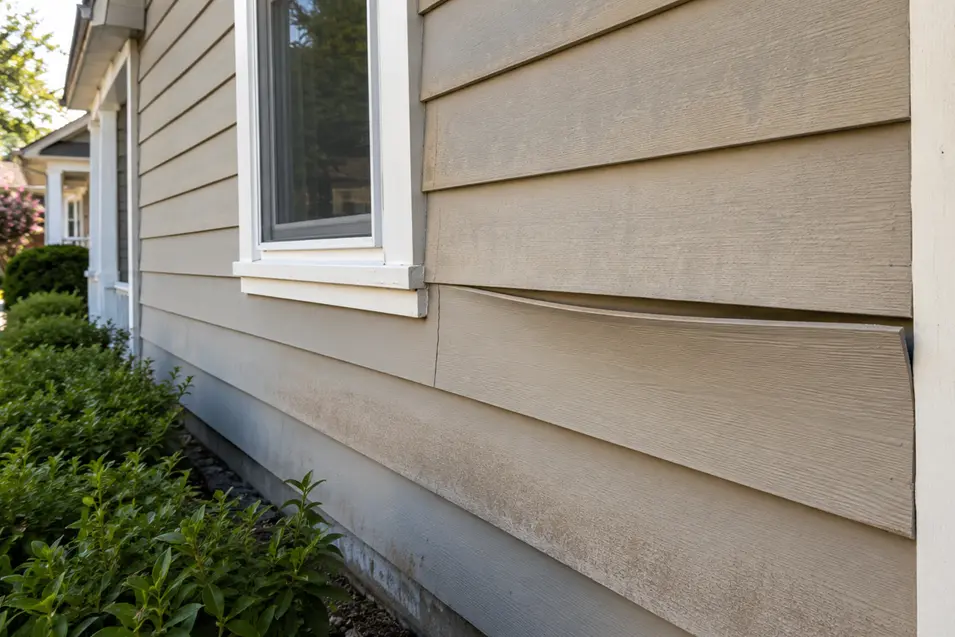
Panels that have pulled away from the wall. Look along the length of a wall from one corner, sighting down it like you would a piece of lumber. Anything bowing out or sitting proud of its neighbors has come loose from what’s holding it.
Soft spots. Press gently with your thumb in a few places, especially low on the wall and near corners. It should feel solid. If it gives, something behind it is wet or gone.
Paint that’s peeling or bubbling on painted siding, particularly in patches rather than everywhere.
Faded, brittle panels. Fading looks purely cosmetic, but material that’s been baked by years of sun also loses flexibility. Brittle panels crack instead of flexing through hot and cold cycles, so they start failing in more places at once.
Gaps at seams, corners, or around windows where two pieces meet and no longer quite meet.
Here’s the part that motivates people more than any of the rest: catching one of these early is a small job. A localized fix on a panel or two typically runs a few hundred dollars, and honest siding repair at that stage is genuinely a one-day affair. Wait a season or two and the same spot can turn into a full wall elevation running into the thousands, because by then you’re not paying to fix siding — you’re paying to fix what got wet behind it.
Same crack. Different bill entirely.
The Stain Inside That Starts Outside
This one fools nearly everybody.
A faint discoloration shows up on the inside of an exterior wall. Behind the dresser, low in a corner, along the bottom of a window. The instinct is to look for an interior cause — a pipe, condensation, something spilled years ago.
Sometimes it is. Often it isn’t. Water that gets behind siding runs down inside the wall cavity and eventually makes itself visible on the drywall, which means the interior stain is the last stop, not the first. The actual entry point is outside, usually higher up, sometimes several feet to one side.
The other quiet symptom: heating and cooling bills that have crept up without any obvious explanation. Wet insulation stops insulating. When the weather barrier behind your siding fails, that cavity gets damp, the insulation mats down, and your furnace works harder every month while nobody connects it to the small crack out by the downspout.
A Soapy-Water Trick You Can Do From the Ground
If you want a quick read on whether a suspicious section is actually letting water through, there’s a test you can run this afternoon with a spray bottle.
Mix a little dish soap into water. Spray it on the suspect area — around a crack, along a seam, wherever you’re unsure. Then watch closely.
Small bubbles forming means air is moving through, which means water can too. It’s not laboratory science, but it’s a decent tell, and it’s a lot better than guessing. You do it standing on the ground, no ladder, no tools, no risk.
If you get bubbles, that section deserves a proper look before the next stretch of wet weather rather than after.
Why “Just Cosmetic” Usually Isn’t
The logic that makes people wait goes like this: it’s a small crack, the wall’s still standing, rain runs down the outside anyway.
But siding isn’t a solid shell. It’s the outer layer of a system that’s designed to keep water on the outside and let anything that sneaks past drain away and dry out. Break the surface and water gets to the layer behind it — sheathing, house wrap, framing. That space doesn’t get sun and doesn’t get much airflow. Things that get wet in there tend to stay wet.
Wood that stays damp starts to break down. Fasteners lose their bite. What began as a crack the width of a pencil line becomes a section of soft sheathing, and by the time anybody notices, the repair includes structural work nobody budgeted for.
Warped or buckled panels tell a similar story from the other direction. A panel that’s pulled away hasn’t just gone crooked — it’s detached from what was holding it. Now there’s a gap that admits water, wind, and, sooner or later, insects looking for somewhere sheltered to spend the winter.
Your Material Has Its Own Way of Failing
Knowing what your house is wearing tells you what to watch for.
Vinyl moves a lot with temperature. It expands in summer heat and contracts hard in cold, and after enough cycles it cracks or buckles. It’s also the material where color matching gets tricky — older profiles and discontinued colors sometimes can’t be matched exactly, which is worth knowing before you’re standing there comparing samples.
Fiber cement is tough and stable, but the factory-applied finishes on many product lines come with a catch: painting over them with ordinary exterior paint can void the finish warranty. If you’ve got fiber cement and something needs touching up, check the manufacturer’s protocol before anybody opens a can of paint.
Engineered wood performs well as long as the seal at the panel ends and joints holds. Once that seal goes, moisture gets into the edge and the panel swells, usually faster than people expect. The real fix addresses where water is getting in, not just the swollen board.
Real wood rots where there’s a moisture path. Replacing a rotted board without finding and closing that path just means you’ll replace the new board on the same schedule.
Aluminum dents on impact and corrodes at cut edges and around fasteners, especially anywhere near salt air.
Repair or Replace — the Rough Rule
The question everybody asks, and there’s a reasonable rule of thumb.
If the damage covers less than roughly 20 to 30 percent of the total surface, and your material still has years left in it, repair usually makes sense. You’re addressing specific spots on a system that’s otherwise doing its job.
Once damage is showing up on several walls at once, or the material has hit the end of its expected life, or you’re finding problems every time you go looking — the arithmetic flips. Repeated repairs on failing material add up to more than replacement, and you end up with a patchwork of colors and vintages besides.
Age matters as much as area. Mid-life material with one bad wall is a repair. Thirty-year-old material with three bad walls is a conversation about replacement.
What Usually Turns Up Under the Panel
Worth setting expectations, because this catches people off guard.
Nobody knows exactly what’s behind a damaged section until it comes off. A fair number of jobs that start as panel replacement turn up damp sheathing, a torn or improperly lapped weather barrier, or evidence that whoever did the original work cut a corner around a window.
That’s not a contractor inventing work. That’s the reason the panel failed in the first place, and covering it back up guarantees a repeat.
What you should expect: work stops, you get shown photographs of what’s there, and you approve the revised scope before anything else happens. Anyone who discovers extra damage and just keeps going, then presents you with a bigger invoice at the end, is doing it wrong. Ask about that policy up front and you’ll learn a lot about who you’ve hired.
One more scheduling note: most sealants and adhesives need temperatures above roughly 40°F to cure properly. In late fall and early spring, a good crew will wait for a warm enough window rather than push through and have the seal fail in a year.
The Walk Around the House You Should Do Twice a Year
Pick a Saturday in spring and one in fall. Fifteen minutes, no equipment.
Start with the north side and anywhere else that stays shaded. Those walls stay damp longest and show trouble first.
Look under every downspout and along the drip line where a gutter overflows. Chronic splashing does a number on the bottom courses.
Check the seams around windows and at outside corners. Water finds joints before it finds flat surfaces.
Look at the bottom couple of feet all the way around, especially where siding meets the foundation. Splashback, snow piling, mulch heaped too high — all common causes.
Then go behind the shrubs. Seriously. The wall nobody has looked at in six years, because a hedge grew in front of it, is very often the wall with the problem.